How to Create the "Colorful Colorado" Graphic
BEFORE YOU BEGIN:
A. You will want to select a large font for this graphic. The smaller
fonts do not allow the background graphic (the Colorado flag) to show through
as well. Here are a couple of good font resources:
http://www.coolarchive.com/fonts.cfm
(CoolArchive)
http://www.freecenter.com/fonts.html
(Free Font Sites)
B. You will need to have your background image selected. For this particular
graphic, I first created a Colorado flag. As
you can tell, the graphic looks a little unusual. In a later step I will address
this size issue.

STEP 1:
A. Open Fireworks and from "File" select "New."
From here you will need to select the size of your graphic. For this graphic
I selected 375 x 75 pixels.
B. For this particular graphic I selected a white canvas due to the
fact I knew it would be placed on a white web page. If you are wanting to
place your graphic onto a web page with a colored background, be sure to select
"Transparent" for the canvas color.
STEP 2:
A. From your "Tools" menu, select "Text."
You can see what my window for this step looked like below.
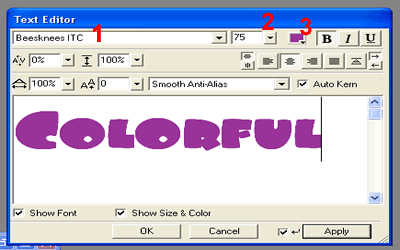 |
1 - The font style
I used was Beesknees ITC. You will now want to center the text on your canvas. |
STEP 3:
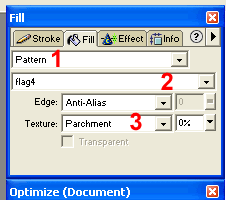
From the "Fill" menu, select the "Fill" tab.
 |
1
- From the pull-down menu, select "Pattern." 2 - This pull-down menu allows you to select your background graphic. In this case, it is the Colorado flag. You will have to choose "Other." By doing this, a new window allowing you to locate the image file will open. TIP/TRICK: Be sure to know where on your computer this file can be found. While working on this project, I just kept my graphics on the desktop. This eliminated a little extra searching. 3 - You want to play with the "Texture" type to get the effect you want. |
||
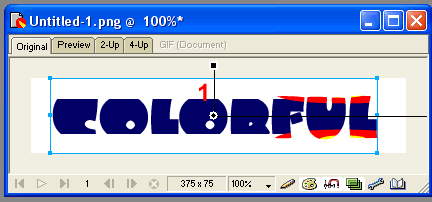 |
This is what your graphic will now look like. Yes! It looks a little funky...but don't worry! 1 - Follow STEP 4 below to learn about this black line. |
||
TIP/TRICK: As mentioned earlier, I stated that I had modified the size of my Colorado flag image. At this step in the creation of my graphic, I realized through several trial and errors that my flag image needed to be re-sized to better fit my font. This can easily be done by selecting "Image Size" from the "Modify" menu. This really is a trial and error situation depending on your background image.
STEP 4:
You are now able to move your background image into the desired position.
You can slide up, down, right, or left, as well as rotating it on a set axis.
STEP 5:
After you have the background image just where you want it, it is time to
add the effects to the font. While having your text selected, (it will have
the blue box around it) go to the "Effect" window/menu.
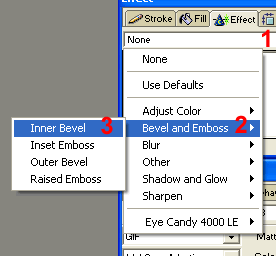 |
1 - From the "Effect"
tab, you will want to use the pull-down menu. (The arrow for this was
cut from the image.) |
STEP 6:
You are now ready to fine tune the effects you just added to the font. Still
having your text selected, go back to your "Effect" window/menu.
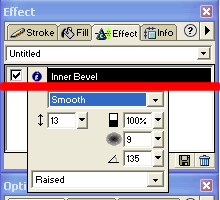 |
1 - Before
you see the window to the left, you will see just the words above the
red line. 2 - Double click on the words "Inner Bevel." 3 - Make the appropriate changes: Smooth, 13, 100%, 9, 135, Raised. Once again, you will want to manipulate these various tools to get your desired affect. |
You're graphic should
now look like this:

STEP 7:
A. You will want to save this image and move onto the word "Colorado."
B. After saving (not exporting) your "Colorful" image, simple
select the text tool and change the text to "Colorado." Once again,
be sure that you click on "Apply."
C. From the "File" menu, select "Save As" and enter
a NEW image name.
TIP/TRICK: If you select "Save"
you will overwrite your first image.
STEP 8:
In order to use your new graphics in a web site, you will want to export them
both. From the "File" menu, simple select "Export" and
a new window will open. This window allows you to select what type of image
you want to make it and where you would like to save it to. Complete this
procedure for each graphic.
Copyright � 2002 J. Jensen - All Rights Reserved.